개요
파이썬 역시 객체지향언어로, 타 언어와 비슷하게 클래스를 선언하여 객체를 만들 수 있다. 다른 것은 알고있던 것과 다 비슷했는데, decorator부분이 다소 어렵게 느껴졌던 것 같다. 두번째 파트에서는 코드가 모듈화되어 하나의 프로젝트를 이루기까지 어떤 과정이 필요한지 배울 수 있었다.
아래는 목차이다.
파이썬의 객체지향성
- 객체는 속성(attribute)과 행동(action)을 가지며, 각각은 변수(variable)와 함수(function)로 구현된다.
- 우리는 앞서 선언된 어떤 클래스(=설계도)에 대하여 새로운 인스턴스(=실제 구현체)를 선언할 수 있다.
‘객체’라는 말은 ‘인스턴스’라는 말과 같은 의미로 사용된다.
#declare_clss.py class SoccerPlayer(object): # 객체 초기화 예약함수 '__init__' # 반드시 모든 함수에는 'self'가 parameter로 들어가야 한다. def __init__ (self, name:str , position:str, back_number:int): self.name = name self.position = position self.back_number = back_number # __str__은 print(클래스)에서 출력될 문자열을 반환한다. def __str__ (self): return f"Hello, my name is {self.name}." # __add__는 서로 다른 두 클래스에 덧셈 연산시 결과값을 반환한다. def __add__(self, other): return self.name + other.name - 언더바 2개가 붙은 함수는 특수한 예약함수(혹은 변수)거나 함수명 변경(맹글링)이 의도된 함수이다.
__init__,__str__,__add__외에도 다양한 예약함수가 존재한다. - class이름 뒤에 붙는 괄호 안에는 상속할 부모 클래스의 이름이 들어간다. 상속할 부모 클래스가 딱히 없으면 기본적으로
object클래스를 상속해야한다.
다만 python3부터는 자동 상속이 적용되므로object클래스의 상속이 필요할 경우 안적어줘도 무관하다. - 각 메소드의 parameter로
self가 들어가는데self가 있어야만 클래스 메소드로 인정되며, 당연히self는 자기 자신을 가리킨다. 타 언어의this와 같은 역할이다.
객체 지향의 특징
다른 언어와 모두 겹치는 내용이지만 한 번 더 짚고 넘어가기로 하자.
- 상속(Inheritance)
뒤 괄호에 부모클래스의 이름을 써서 상속받을 수 있다.#inheritance.py class Person: #부모 클래스 Person 선언 #Python 3.x부터 뒤 (object) 생략 가능 def __init__(self, name, age, gender): self.name = name self.age = age self.gender = gender def __str__(self): return f"My name is {self.name}." def about_me(self): print(f"I'm {self.age} years old.") class Employee(Person): def __init__(self, name, age, gender, salary, hire_date): super().__init__(name, age, gender) # 부모 객체의 생성자를 그대로 사용 # 부모 객체의 메소드는 super()을 통해 접근 가능 self.salary = salary self.hire_date = hire_date # 속성 추가 def do_work(self): # 메소드 추가 print("Hard working ... ") def about_me(self): super().about_me() # super에 꼭 괄호 함께 붙이기 print(f"My salary: {self.salary} WON") my_employee = Employee("Lee", 34, "Male", 300000, "2021/01/20") my_employee.about_me() # I'm 34 years old. # My salary: 300000 WONsuper()는 부모 클래스를 불러오는 메소드로, ‘()‘를 붙여야한다는 점을 유의하도록 하자. -
다형성(Polymorphism)
상속 부분의 코드에서도 보았지만 같은 이름의 함수(위에서는about_me())에 대하여 상속받은 클래스들은 내부 로직을 다르게 작성할 수 있다.#polymorphism.py class Animal(object): def __init__(self, name): self.name = name def talk(self): #Abstrct method raise NotImplementedError("Subclass must implement!") class Cat(Animal): def talk(self): return "Meow!" class Dog(Animal): def talk(self): return "Woof!" animals = [Cat('Meower'), Cat('Mr.cat'), Dog('Lassie')] for animal in animals: print(animal.name + ': ' + animal.talk()) # Meower: Meow! # Mr.cat: Meow! # Lassie: Woof!#polymorphism_error.py ... anonymous = Animal('I don\'t know') print(anonymous.talk()) # ERROR! # NotImplementedError Traceback ... # ... # NotImplementedError: Subclass must implement다형성은 코드만 봐도 쉽게 이해할 수 있다.
-
가시성(Visibility)
객체 정보를 볼 수 있는 레벨을 조정할 수 있다. C++이나 JAVA등에서는private,public등으로 표현되는 그것이다.
파이썬에서는private대신 변수명 앞에 언더바(‘_’) 2개를 붙인다. 이렇게 변수명에 언더바를 붙여 외부의 접근을 막는 변수 네이밍이 앞서 말한 맹글링이다.#visibility.py class MyObject: def __init__(self): self.__items = [] def add_new_item(self, product): self.__items.append(product) def print_item(self): for item in self.__items: print(item) my_object = MyObject() my_object.add_new_item(5) my_object.print_item() # 5 # 여기까진 OK my_object.__items.append(5) # ERROR! # 'MyObject' object has no attribute '__items'다만 모종의 이유로
private변수에 접근할 경우가 있는 경우 decorator ‘@property‘를 사용하면 된다.#visibility_decorator.py class MyObject: def __init__(self): self.__items = [] def add_new_item(self, product): self.__items.append(product) @property #decorator 사용 def items(self): return self.__items # 보통은 리스트 반환 시 복사해서 반환할 것이다. # 그렇지 않으면 외부 동작이 내부 변수에 영향을 줄 것이다. my_object = MyObject() i_want_items = my_object.items # '()' 없이 변수처럼 사용 print(i_want_items) # [5] # 에러 없이 items를 가져올 수 있다.맹글링(mangling)이 완벽하게 멤버변수를 보호할 수 있는 아니다. 그러나 의도적인 직접 접근을 막아야하는 상황에서는 사용하기 좋은 방법이다.
decorator
- 먼저 알고 갈 개념들
- first-class object (일급 객체)
- 변수나 데이터 구조에 할당 가능한 객체, parameter로 전달이 가능하며 리턴 값으로도 사용한다. 파이썬의 함수는 일급함수이다.
- 그냥 함수를 파라미터 혹은 반환값으로 사용할 수 있다는 점을 이해하면 된다.
  #first_class_object.py
  def square(x):
      return x * x
  def cube(x):
      return x * x * x

  def formula(method, argument_list):
      return [method(value) for value in argument_list]

  formula(square, [5, 4]) # 25, 16
  formula(cube, [5, 4]) # 125, 64
- inner function (내부 함수)
- 함수 내에 또 다른 함수가 존재하는 구조. 굉장히 자주 사용하는 구조다.
- inner function을 반환하는 경우를 closure라고 한다.
#inner_function.py def print_msg(msg): def printer(): print(msg) return printer #함수 return도 가능 another = print_msg("Hello") another() # Hello - 비슷한 목적을 가진, 변형된 함수를 여러 개 만들고 싶을 때 closure를 사용한다.
  # closure.py
  def tag_func(tag, text):
      text = text
      tag = tag

      def inner_func():
          return f'<{tag}>{text}<{tag}>'
      return inner_func

  h1_func = tag_func('title', "This is Python")
  p_func = tag_func('p', "Data Academy")

  print(h1_func()) # <title>This is Python<title>
  print(p_func()) #<p>Data Academy<p>
- first-class object (일급 객체)
-
그래서 데코레이터란?
함수를 받아 명령을 추가한 뒤 다시 함수를 반환하는 함수이다.
함수의 내부를 수정하지 않고 기능에 변화를 주고 싶을 때 활용한다.
아래 예시처럼 기존 함수에 전처리와 후처리를 추가하고 싶을 때 많이 사용한다.#decorator_1.py def star(func): # 이 경우 **kwargs는 사용하지 않는다. def inner(*args, **kwargs): print(args[1] * 30) func(*args, **kwargs) print(args[1] * 30) return inner @star def printer(msg, mark): print(msg) printer("Hello", "*") # ****************************** # Hello # ******************************-
printer라는 함수 위에star라는 decorator를 붙였다. 따라서printer함수는star함수의 parameter로printer함수를 넣었을 때의 반환값(함수)으로 바뀐다. -
이 부분은 많은 이해가 필요하므로 여러 코드를 보도록 하자.
# decorator_2.py def star(func): def inner(*args, **kwargs): print("*" * 30) func(*args, **kwargs) print("*" * 30) return inner def percent(func): def inner(*args, **kwargs): print("%" * 30) func(*args, **kwargs) print("%" * 30) return inner @star # second @percent # first, def printer(msg): print(msg) printer("Hello") # ****************************** # %%%%%%%%%%%%%%%%%%%%%%%%%%%%%% # Hello # %%%%%%%%%%%%%%%%%%%%%%%%%%%%%% # ******************************- 먼저
printer함수는percent함수에 들어가게 된다. 이 상태에서printer함수를 동작시키면 아마 Hello 위아래로 % 기호만 출력될 것이다. 이제@percent를 거친printer함수는star함수를 거치게 된다. 이제printer함수를 동작시키면 %로 감싸진 Hello를 다시 *이 감싸게 된다. 살짝 다단계(?) 형태이다.
#decorator_3.py def generate_power(exponent): # exponent = 2 def wrapper(f): # f = raise_two def inner(*args): result = f(*args) return exponent**result return inner return wrapper @generate_power(2) def raise_two(n): return n**2 print(raise_two(7)) # 562949953421312 (2^49)- 마지막 예시 코드이다. 복잡해보이는데, 차례대로 보면 간단하다.
- 위 코드의 경우, decorator에 추가적인 parameter가 들어갔다. 이런 경우 먼저 해당 함수에 parameter가 먼저 들어간다. 즉,
exponent는 2가 된다. - 다음,
wrapper에는raise_two함수가 인자로 들어가게 된다. inner의 parameter인*args에는 기존raise_two함수의 parameter인n이 들어가게 된다. 위의 경우,n은 7이 된다.- 따라서 순서대로 계산해보면, 위 경우
print(raise_two(7))에서args = (7, )이므로result는 7 ** 2에서 49, 반환값은 2^49가 되는 것이다.
- 위 코드의 경우, decorator에 추가적인 parameter가 들어갔다. 이런 경우 먼저 해당 함수에 parameter가 먼저 들어간다. 즉,
- 복잡하지만, 각 parameter에 주어진 것들을 순서대로 집어넣으면 의도하는 바를 이해할 수 있다.
-
모듈과 패키지
우리가 ML/DL을 배우기 위해 굳이 Python을 배우는 이유가 무엇일까? 물론 쉽고 간편해서도 있겠지만 ML/DL 관련 라이브러리가 가장 발달한 언어 중 하나가 Python이기 때문이다. 라이브러리를 구성하는 모듈과 패키지에 대해 알아보자.
특정 기능이 구현되어있는 파이썬 파일(.py)을 모듈이라고 한다. 또한 그러한 모듈들을 특정 목적을 위해 하나로 모아둔 것을 패키지라고 한다. 이러한 모듈이나 패키지 등을 하나로 묶어 라이브러리라고 한다.
이미 널리 알려진 사실이고, 또한 이미 알고 있는 부분이기 때문에 여기서는 다시 한 번 짚고 넘어갈 점들만 간단하게 보고 가자.
모듈
- 모듈을 호출하려면 모듈 파일이 같은 디렉토리에 있어야한다.
- 단순히
import만 하면 해당 파일의 모든 코드가 메모리로 올라간다.
따라서if __name__ == "__main__"을 써서 불필요한 코드를 감추거나, 사용자가from ... import ...의 형태를 써서 필요한 메소드만 가져와야한다. 모듈을 불러오는 방법은 크게 3가지가 있다.- Alias 설정
#import_as_alias.py import my_package as mp mp.my_method() - 모듈에서 특정 함수 또는 클래스만 호출
from my_package import my_method my_method() - 모듈에서 모든 함수 또는 클래스 호출
  from my_package import *
  my_method()
- Alias 설정
- Python이 기본 제공하는 라이브러리를 Built in Modules라고 부르며
random,time등이 있다.
패키지
- __init__, __main__ 등의 키워드 파일이 사용된다.
- 각 폴더별로 필요한 모듈을 구현한다.
- 각 폴더별로 __init__.py가 존재한다. (단, python 3.3+ 부터는 없어도 됨)
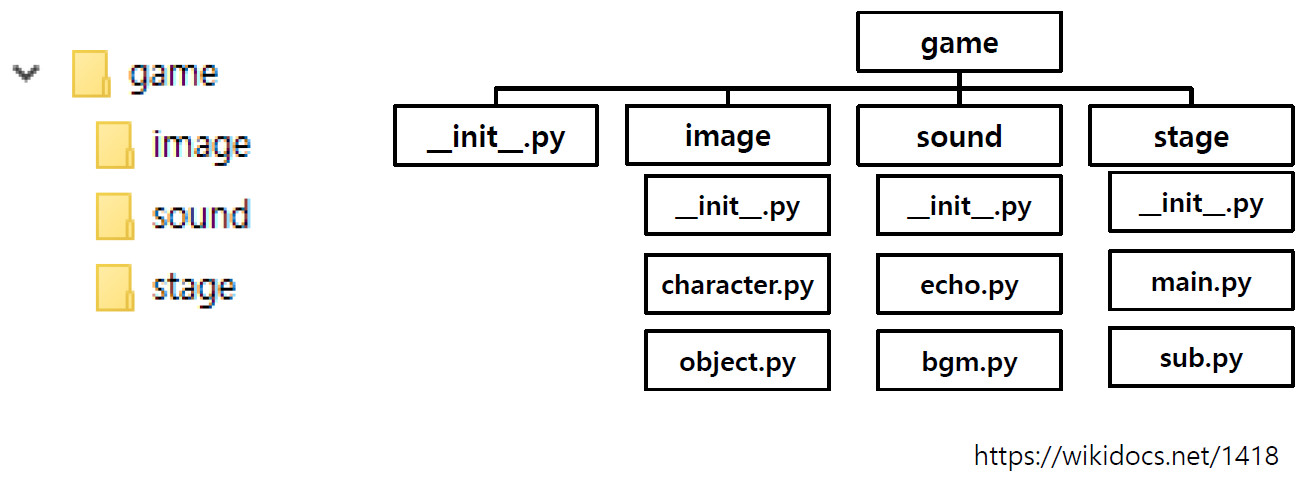
폴더별로 필요한 모듈을 구현하면 폴더 자체를
import하여 그 안의 모듈들을 불러 사용 가능하다. - 각 __init__.py에서는 사용할 모듈의 이름을 아래와 같이
import한다.#game/__init__.py __all__ = ["image", "sound", "stage"] from . import image from . import sound from . import stage#game/stage/__init__.py __all__ = ["main", "sub"] from . import main from . import sub#game/image/__init__.py ...#game/sound/__init__.py ... - root폴더에 __main__.py를 만들어 해당 root 폴더의 이름으로 python에서 바로 실행할 수 있다.
 #game/__main__.py
 from sound import echo # 폴더에도 이름으로 접근 가능

 if __name__ == "__main__":
     print("Hello!")
 ...
$ python game Hello!
가상환경 설정
- 여러 프로젝트를 동시에 관리할 때 버전 충돌이 일어날 수 있으므로 각 프로젝트별로 필요한 패키지만 설치하는 환경이 필요하다.
- 파이썬에서는 패키지 관리 도구로 virtualenv와 conda를 사용한다.
- conda 가상환경 설정
$ conda create -n [NAME] [PYTHON_VERSION] $ conda create -n my_project python=3.9 - conda 가상환경 호출 및 해제
  $ conda activate my_project
  $ conda deactivate
그 외
- 파이썬의 함수명/변수명/클래스명에 대한 기본적인 코딩 컨벤션을 알고 가도록 하자.
- snake_case: 띄어쓰기에 ‘_‘를 대신 사용한다. 주로 함수명, 변수명에 사용한다.
- CamelCase: 띄어쓰기 대신 해당 부분에 대문자를 사용한다. 주로 클래스명에 사용한다. 특히, 클래스명의 경우 첫글자도 대문자로 시작한다.
-
- 강의 레퍼런스로 올라온 글이다. 요즘은 프로그램을 짤 때 객체지향을 기본으로 깔고 가는 경향성이 있다. 그러나 오히려 객체지향에만 집착하고 코드를 짜면 가독성과 기능성을 저해할 수도 있다.
- 맹목적으로 객체지향만을 바라보고 굳이 필요 없는 것까지 클래스화하는 등의 습관은 당연히 버리는 것이 좋다. 어떻게 보면 당연한 내용의 글이지만, 우리가 코딩을 할 때 의식적으로 지양할 점들에 대해 다시 한 번 되새길 수 있었다.